Tent repair and maintenance: our guide to caring for camping gear
Whether you’re camping with the family in the sunny South West or are taking on an extreme wild camping expedition, your tent is liable to take a beating
One of our more memorable wild camping trips involved facing the elements to pilfer a spare peg from a flattened tent while yards away from Grisedale Tarn in the Lake District – more than a few tents were beyond repair after that storm.
More and more these days, though, we’re encouraged to repair and reuse clothes and equipment rather than replacing them with something new. It’s for good reason, too – not only can you save money but it’s far better for the environment to keep camping gear from ending up in landfill.
If stitching up a ripped flysheet or mending a snapped tent pole feels beyond you, we’ve got you covered – this is your complete guide to repairing and maintaining your tent.
Page contents
- Preparing for your next camping trip
- Tent cleaning
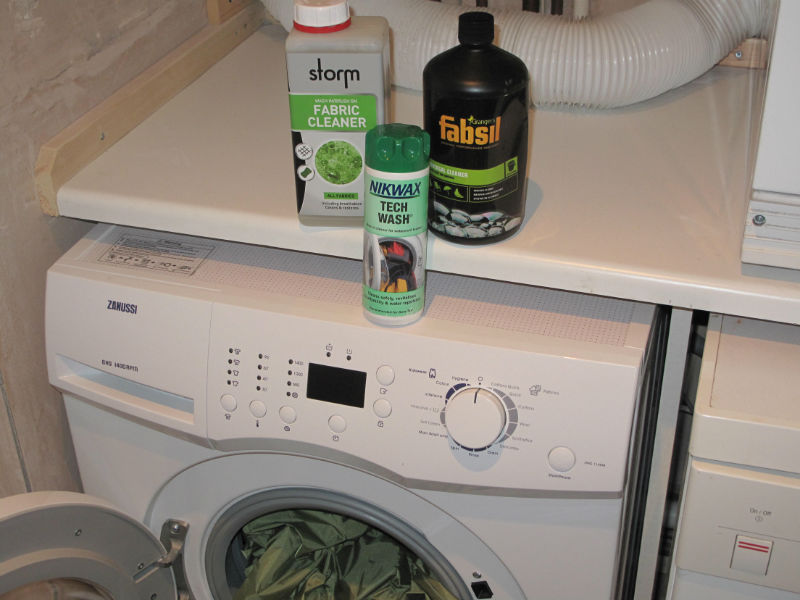
- Re-waterproofing your tent
- Fixing rips and tears in tents
- Tent pole repairs
- Protecting groundsheets
- Tent repair kit
- Storing your tent
- About our magazines
Words by Jack Hart and Iain Duff
Preparing for your next camping trip

(Photo from Adobe Stock)
Some tent breakages are obvious – in our above example, broken poles and ripped guylines were strewn across the ground.
Some, though, are much more subtle and begin as an innocuous tear that is easy to ignore. Before you embark on a camping trip, it’s a wise idea to give your tent a once-over to spot those small issues before they turn into major repairs.
A week or two before your trip, get your tent out of storage and check over the material, paying particular attention to the seams and outer waterproof flysheet.
Some tears will be easy to spot but others may need you to hold the material up to a light before you can see them. Most of the time you perform a check like this, there will be nothing to see, but it’s always worth double-checking – you’ll be unpopular if the tent leaks on the first night of your family holiday.
Tent cleaning
Part of the enduring appeal of camping is to shrug off the hustle and bustle of everyday life and return to nature – that doesn’t mean you need to live in a tent that hums of a thousand previous uses, though.
Cleaning your tent can help to avoid the build-up of mould and mildew, which are among the leading causes of tent fabric deteriorating and losing its waterproof properties.
Fortunately, tent cleaning is a simple and easy job, too:
- Pitch your tent on a warm, dry day.
- Brush out any dirt or debris that’s hitchhiked home from your camping spot.
- Use a sponge and some warm, soapy water to wipe off any stubborn dirt marks that remain.
- If the weather was bad and your tent is particularly soiled, you may need to soak it in soapy water for a short time.
- Allow the tent to dry completely before packing it away.

(Staff photo)
Re-waterproof your tent
An extra task you can perform while you’re checking your tent for tears is to re-waterproof the outer flysheet.
This is not a regular task – most tents shouldn’t need re-waterproofing for several years if bought from new and then will only need topping up about once a year, depending on how often it’s used.
A reproofing solution, like OLProof from Olpro, restores the material’s waterproof properties, returning it to a state where water bubbles on its surface rather than soaking in.
Reproofing is a simple task but one that you need to take your time over:
- Pitch your tent on a warm, dry day. Make sure you’re outside so there’s plenty of fresh air – tent reproofers are chemicals, after all.
- Paint or spray the solution onto the tent’s surface, making sure there’s an even coat across the whole tent exterior.
- Use a clean cloth to wipe away any excess solution.
- Allow to dry completely before packing the tent away.
Tent repairs: how to fix common issues

(Staff photo)
You may find a tear or broken pole when performing a check of your tent or you might discover one while camping – either way, an effective repair can help you carry on using the same tent for years to come rather than spending hundreds on a new one.
Here’s our advice for some of the most common tent repairs:
Fixing rips and tears in tents
Happily, tents are able to take quite a lot of abuse but every now and then the fabric will be torn and a repair is needed.
As they are not meant to be waterproof, inner tents can be stitched up fairly easily even when torn in a ragged pattern.
Damage to the outer waterproof flysheet is different. First of all, check the overall state of the fabric. If the damage is down to material being weakened and worn out by age or the effects of the sun, then a temporary fix might be all that is possible and a new tent will need to be added to your shopping list.
An accidental tear or hole in a newer tent with years of life ahead of it needs a different approach.
Self-adhesive patches or a short-length of Duck tape can be used as an emergency fix for a small tear or hole. But make sure the area around the damage is clean and dry to ensure a secure fix. Spray all around the repaired area with reproofer to make it more waterproof.
Tent windows can also be repaired with tape – and you can even get clear versions of tape if you prefer.
Once home, it is time to assess the problem and decide how best to deal with it for the long term. A nylon flysheet that is torn cleanly is relatively easy to hand-sew or run through a domestic sewing machine. Once the repair is done, paint on both sides with seam sealant. It pays to add plenty of extra stitching at each end of the rip to ease the inevitable weakness under strain.
Sometimes ragged tears and seams are too awkward to sew and if that is the case it makes sense to add a patch. Make sure it is big enough to cover the rip generously with edges folded under to avoid them unravelling. Gluing as well as sewing the patch helps to spread the strain on stitches but ensure the glue won’t damage the material. Sewing patches together on each side of the rip or hole, gluing them and applying seam sealant should ensure a durable flysheet repair.

(Photo from Adobe Stock)
Tent pole repairs
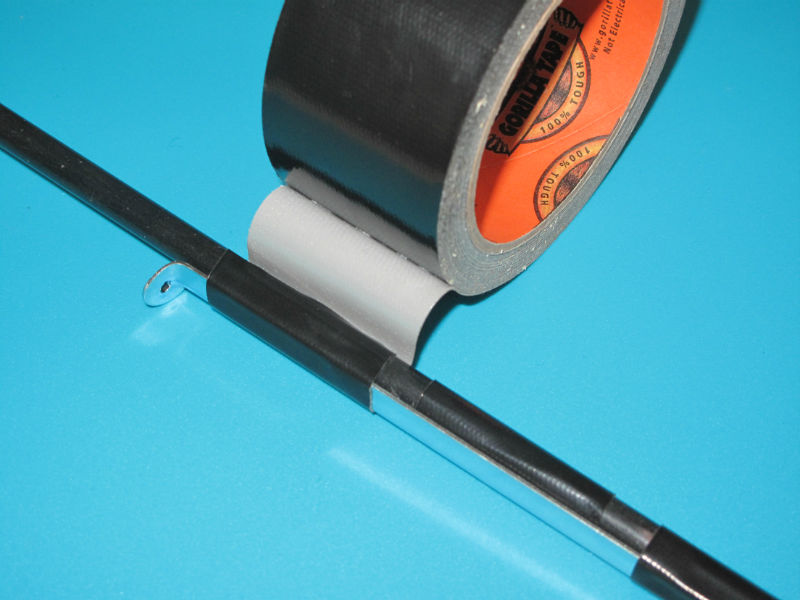
For an effective temporary repair to a snapped pole, slide a short metal tube over the break and tape in place. Most repair kits will come with one of these sleeves but if yours has gone missing (or has already been used) then a length of tube of the correct diameter from a hardware shop will do the trick.
If a fibreglass pole splits along its length, the answer is to wrap the pole in Duck tape.
A wide range of spares is available, including spring clips for poles, pole kits and sections and shock cord repair kits.
On inflatable tents, the air tubes are tough and should provide years of trouble-free camping if you follow the instructions. But if you do get a puncture it’s possible to repair it yourself, at least until you can contact your dealer to organise a replacement.
First of all, don’t open the protective sleeve until you’re sure you have a leak and never open it when it’s fully inflated. If a tube appears to have lost pressure, it may actually be due to environmental factors – pressure can drop in cold temperatures so you may need to add air to compensate, particularly at night.
If you are sure that you have a puncture, let out all the air and try to locate the damage. Look for visible damage and if that doesn’t help, pump in some air and listen closely for air escaping or feel it against your cheek. Apply a little water to the spot you suspect as small bubbles will show up. Once you’ve found the puncture, mark the damaged area, completely deflate the tube and open the sleeve zip until you reach the location of the leak.
Clean the area around the puncture then cut out and carefully apply a repair patch (Storm, Tear-Aid and Stormsure all supply suitable products), ensuring that it’s smooth and there are no air bubbles present. Once the adhesive is dry, replace the sleeve and inflate, leaving overnight to make sure the repair has worked.
In an emergency, you can also use Duck tape, although this is unlikely to be a long-term solution. When you get home, contact your retailer and find out about being sent a replacement tube.
.JPG)
(Staff photo)
Repairing tent zippers
Zips are one of the simplest parts of the tent design but one that can go wrong so easily. Pitching the tent properly should avoid the problem of the zips bursting open because the fabric is drawn too tight.
The other side of the coin is catching loose fabric in the zip’s teeth. You need to avoid damaging zip and fabric. Keep the zips free of dirt or grit to help them to run freely and, if all else fails, make sure you pack a few safety pins to secure the door.
Fixing bent tent pegs
Tent pegs are the bane of many a camper and are responsible for plenty of collapsed tents and broken toes, but they are essential to camping so it’s worth looking after them.
If you’ve been hammering pegs into rocky ground or have endured particularly windy conditions, the pegs may well have bent while you’re enjoying your holiday. Some of these will be simple to fix – just hold the peg in two hands and bend it back.
In some cases, though, the peg is too far gone or is too thick to manipulate by hand. Your best bet is to keep some spare pegs around for that eventuality and fix it when you get home – once it’s clamped and being bent by a pair of pliers, even the most stubborn peg should shift back into position.
Protecting groundsheets
.jpg)
(Photo from Shutterstock)
In the history of tents, sewn-in groundsheets are a relatively recent development. For thousands of years, the lack of them meant that tent sides could be rolled up for ventilation during the day. As camping became a recreation, groundsheets were sewn into the sides to form an insect-proof shelter that also kept out draughts. The benefits are obvious but there are also a couple of problems.
First, groundsheets may leak over time, depending on the material used, as well as being vulnerable to rips and tears. As manufacturers wrestle with overall tent weights, so groundsheets become lighter and less durable.
Second, every time the tent is packed away, even on lovely drying days, the damp under the groundsheet (as well as, maybe, mud and dying grass) can damage the tent fabric if not aired off properly at home.
Protection of the groundsheet from the ground can be ensured by using a tent 'footprint' – a groundsheet for the groundsheet, as it were. It will extend the useful life of the tent plus makes packing up easier. A carpet for the living area of the tent is obviously kinder underfoot than a cold groundsheet and will also help to protect any waterproof coating.
It's hard to argue with the benefits offered by extra comfort and protection but you don't need to shell out for custom-fitted options. A large cheap 'plastic' tarp will serve as a footprint but it's harder to find a lightweight carpet to fit. Instead of carpet, depending on the size of tent, cheap fleece would do the job or even a picnic rug or two.
It's tempting (but silly) to follow the advice on saving money while keeping the benefits of fitted carpets published in Viz - just strap pieces of carpet to your feet.
Our top tips for protecting your groundsheet:
- Compared to the size and weight of a large family tent, a carpet and footprint take up little space in the car but make quite a difference to comfort and durability
- As spreading out the footprint is the first job on site, packing it last so it's easy to hand makes sense; think about how you want to position the tent.
- Once you're happy about which way the tent will be facing, peg out the corners of the footprint to avoid tripping over it or having it bunch up under the tent
- Unpacking the tent is easy when you're not worried about dragging the tent through mud and wet; try to walk about on the footprint as little as possible
- Spreading out the tent is relatively easy as it slides easily over the footprint; check that the doorways are where you want them before starting to erect the tent
- Positioning the tent so it fits neatly over the footprint before pegging makes sense; the tent's groundsheet ensures that the sewn-in groundsheet is protected
- With the tent pitched, it's time to fit the carpet; a useful tip is to fit non-slip fabric to the corners/sides of the carpet if it doesn't have them
- As is usually the case with most aspects of camping (except cooking - too many cooks, etc), two people will make light work of positioning the carpet
Tent repair kit

(Staff photo)
Here are the essentials you should include in your DIY tent repair kit:
- Duck tape: every kit should have a roll. Has a million uses on the campsite – from temporarily patching a ripped flysheet to treating blistered feet.
- Metal pole sleeve: tent poles have a habit of snapping at the most inconvenient times. For an effective temporary repair, slide a short metal tube over the break and tape in place. Most repair kits will come with one of these sleeves but if yours has gone missing (or has already been used) then a length of tube of the correct diameter from a hardware shop will do the trick. If a fibreglass pole splits along its length, the answer is to wrap the pole in Duck tape.
- Spare length of pole: if a repair is impossible, a length of pole is the solution. Some tents come with one included but if not you should be able to buy one from your local retailer or direct from the manufacturer.
- Self-adhesive tent patches: these will cover up any small rips or punctures in your tent’s fabric for the length of your holiday. They come in various fabrics and colours – in fact your tent might even come supplied with a patch of its own. Include a small bottle of reproofer in your kit to spray onto the patch and keep your tent waterproof.
- Needle and thread: split seams and peg loops or guyline anchors coming lose are common problems. A small sewing kit will let you to deal with simple repairs like this.
- Spare guylines: guyropes can get worn through friction, especially the loop that goes around the peg. Pack a decent length of cord and a few adjustable runners for an instant repair.
- Seam sealant: leaking seams can be repaired by painting sealer onto the seam. It’ll take a couple of days to dry fully – and you have to hope there will be no rain in the meantime.
- Bits and pieces: a wide range of spares is available at specialist stores, including spring clips for poles, pole kits and sections and shock cord repair kits.
Storing your tent
While most tears and holes in your tent will appear while you’re camping in the great outdoors, taking care of your kit in storage will go a long way to preventing damage.
Your tent will come with a carry bag and this is what it should be stored in, but make sure you keep it in suitable conditions:
- Avoid damp conditions as your tent could develop mould or mildew
- Also avoid direct sunlight as prolonged exposure will damage the material
- Be mindful of things around your tent – sheds are a popular storage location but just beware of nails, saws and other items that could rip the fabric
- Similarly, rodents and other pests could gnaw their way through the fabric during the cold winter months
- Ensure that your tent is clean and dry before packing it away
Look after your tent
Ultimately, taking sensible precautions will help you to avoid damaging your tent in the first place and some basic practical skills are enough to manage most repairs.
The best approach is to develop a simple routine to take care of your tent: check it out before going camping, use a tent footprint to prevent damage from damp, and effectively clean and dry your tent after each camping trip.
With those precautions in hand, you shouldn’t need to buy another tent for many years!
Expert Camping advice!

Camping magazine has been the voice of campers for over 60 years!
Camping is the UK's only magazine devoted to the wonderful world of life under canvas and the freedom it brings.
Every issue is packed with inspirational travel, the top camping sites to stay on, reviews of the latest tents, camping gear reviews, practical help and much more to help you get the most out of your camping adventures.
Want to know more about Camping magazine?
About Camping magazine


Recent Updates
Camping for beginners: our complete guide
If you’ve never pitched up before, this is where you need to start: our complete guide to camping for beginners, including advice on what to pack and ...
The top 12 long-distance walks in the UK
Hiking and camping go hand in hand, which makes long-distance walks a favourite of campers – this is our pick ...
Camping barbecue: our guide to cooking up a storm this summer
Is there anything more British than sausages grilled on an open flame and dropped on wet grass? Camping and ...
Our family camping checklist: everything you need to pack
Sure, you’ve packed the tent and the sleeping bags – but what about slip-on shoes and glow sticks? These are ...
Our guide to planning the perfect camping road trip
Roll down the window, pop on those shades and crank up the volume – it’s time for a road trip. Get ready for ...
Camping in Europe: our 12 top tips
If you’ve not camped in Europe before, there’s a few tips and tricks you’ll need to avoid some continental ...
Solar power for camping: all you need to know
Staying connected in the great outdoors is easier than ever with a solar charger – or is it? How reliable are ...
Wild camping kit list: everything you need for your next adventure
Make sure you’re ready for anything with this list of lightweight camping gear and clothing, including ...
Camping furniture: all you need to know to make your tent a cosy haven
We delve into the essentials of camping chairs, camping tables, and kitchen and bedroom furniture, ensuring ...
Camping lights for tents: What you need to know
We will guide you through all the lighting options available for you and your tent, including interior ...
Other Articles
Camping kitchen: all you need to know
In the great outdoors, a well-equipped camping kitchen transforms mealtime into a delightful adventure ...
How to pack away your camping gear for winter
A complete guide to packing and storing your gear at the end of the season ...
Camping guide to trailers
Trailer stash or trailer trash? Being able to carry lots of other gear when you go camping isn’t such a bad ...
Winter camping: all you need to know to keep warm
Winter doesn’t have to mean the end of the camping season. With good preparation and the right gear, there’s ...
Camping toilets: a complete guide
If you are wild camping, camping off-grid or the campsite you book onto doesn’t have toilet facilities, you ...
Top tips for camping in windy weather
How to make sure your tent stands up to gusty conditions ...
Camping tents: a complete guide
If you're considering buying a camping tent, whether it's your first time or you're a seasoned camper, making ...
Camping sleeping bags and beds: a complete guide
When it comes to camping, there's one essential item that can make or break your outdoor adventure: the ...
Camping gas: how to use gas on the campsite
A complete guide to using camping gas appliances safely on the campsite, from choosing the right stove to ...
Camping storage: a complete guide
Having problems knowing where to put all your gear when you're camping? Read our top tips and see some great ...